Excel’s great for displaying data and even better at crunching numbers. Here’s how to add cells in Excel to sum up totals automatically… Even when you change the numbers.
A great feature that Excel has to offer is its use of formulas. Since Excel is often used to organize numerical data for a variety of operations, it can be beneficial to have an ‘addition’ function. In this guide, we are going to discuss the various ways we can add cells in Excel.
Why is the Addition Function Useful When You Need to Add Cells in Excel?
As we already know, in Excel Worksheets we can add columns. However, sometimes it is necessary to add cells that are not in columns or are not even next to each other.
For example, let’s say you are performing a survey to present data. You are interviewing random students to find out the most popular subjects taken in school. Your poll is anonymous, allows students to select only one option, and is organized by gender and grade levels Freshman, Sophomore, Junior, and Senior. The survey offers several subjects.
This survey is set up to give you a wide range of information and a variety of totals for you to examine. You could add these totals yourself, or you could use the many ways to add these numbers to Excel.
How to Add Cells in Excel: Method 1 (via Individual Table Cells)
In addition to adding columns in Excel, you can also add horizontally in rows. Let’s say you want to know how many senior males were surveyed. You can do this by adding up all the numbers in the Senior Male row. Let’s say the Senior Males row is row two in columns B2 through H2. One way to add your numbers is to select cell I2 and type the equals (=) sign, followed by the numbers in each cell in that row. For example, it may look something like this:
=5+6+2+7+0+9+1
Then, hit the enter button and you will get your total. While this method works, you will not be able to change the numbers in your cells without also changing your formula.
Because of this problem, it is better to enter the cells than the information within them. Rather than the above example, your formula will look similar to this:
=B2+C2+D2+E2+F2+G2+H2
When you hit Enter after typing this, you will still get your total. However, this time, you will be able to change the information in these cells, and the change will automatically affect the total.
There is another method to adding rows. In this method, select your total cell. In our case, it has been cell I2. Type the equal (=) sign. Next, click the first cell in your row, or B2. This cell will become highlighted and appear next to the equal (=) sign. Then, type the plus (+) sign and click the next cells in the row. Continue this until you have clicked every cell in the row. Hit Enter to view your total.
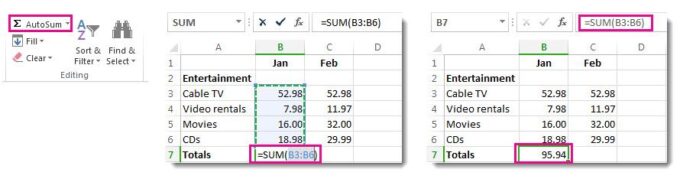
Finally, rows can be added in the same SUM Function that we learned with columns. In your total cell, type =SUM. Then, type or click your beginning cell. Type the colon (:) mark and then type or click on the last cell in your row. It will look something like this:
=SUM(B2:H2)
Hit Enter when you have completed this function, and your total will show up. In this function, you can also change the values in each cell, and the changes will be reflected in the sum.
How to Add Cells in Excel: Method 3 (Adding Up Individual Cells In Different Rows and Columns)
The great thing about the addition function in Excel is that you not only get to add rows or columns. You can also add whatever cells you want to. Let’s stay with our survey example. Perhaps you want to examine precisely how many girls prefer math and science. Excel allows you to do this.
Label your first cell to maintain organization in your document. Click the cell next to it to begin your equation. Type the equal (=) sign, followed by all the cells you would like to add together. For example, your equation may look like this:
=C3+C5+C7+C9+D3+D5+D7+D9
Hit the Enter button when you are finished to get your total.
Of course, as we have already learned, it can be a bit tedious and take a while to type all of that. The alternate method would be to click instead of type. In your total cell, type the equal (=) sign. Then, click your first cell. Type the plus (+) sign and click your next cell. Continue this process until you have clicked all the cells you want to add. When you have selected all your cells, hit Enter to get your total.
Using this method allows you to select any cell that contains a numerical value. The values do not have to be in the same row or column or be next to each other. This method also allows you to change information in cells used in your formula. The modified data will automatically update the total to reflect the new numbers.
Conclusion
It was certainly good news to hear that we can add columns of information within our Excel Worksheets. It made life a lot easier and minimized the work we had to do.
Now, we see that we can also add rows as well as individual cells. This guide has expanded what we can do with the addition function. This function could be vital information when it comes to surveys, projects, and organizing business or personal information.
Follow this step by step guide to add cells in Excel using the addition function to its fullest, incorporating rows and cells into your skill set.