I recently returned from two weeks in Ireland where I installed a couple of Excel reporting systems and came across the dreaded regional date settings. My computer is set for the US region, whereas the client's computers were set for the UK region. When I mention regional settings on my computer, I'm talking about Windows and not Excel.
Trying to get Excel to automatically switch date formats between computers using different region settings was something I experienced a few years ago while working in England. Back then I made the mistake of using Excel to change the formatting for my dates. Not the way to go.
Regional Date Formats
The US Short Date format is represented in the form "m/d/yyyy" which means dates are shown in a "Months/Days/Years" format. Contrast that with Ireland, the UK, and most everywhere else, where the date format is "dd/mm/yyyy" and takes the form Days/Months/Years.

Using the Default Short Date Format in Excel
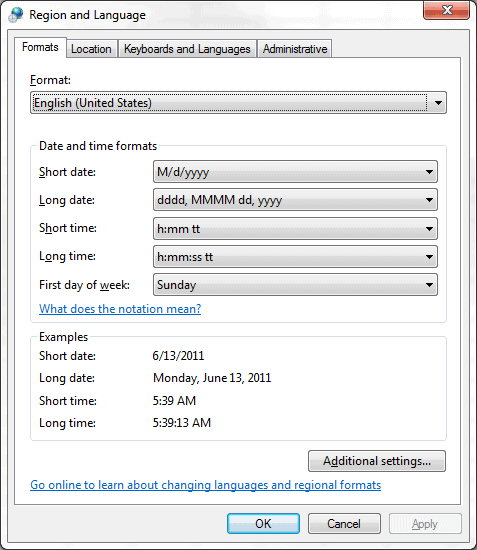
Since I live in the US my computer's regional settings are set for the US. When formatting dates in Excel for files that may be used internationally, it's wise to use date formats that begin with an asterisk (*) per the Format Cells Dialog box.
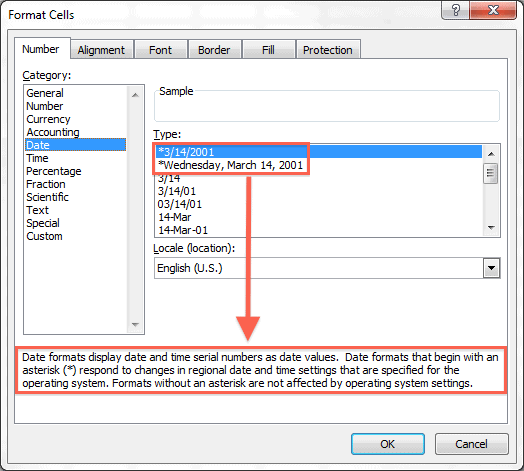
Any date formatted in this manner will display correctly in another region. I can view the date June 13, 2011 in my spreadsheet as 6/13/2011 and send it to a person using a UK regional setting on their computer and the date will automatically display as 13/6/2011.
Nice and neat. We're all speaking the same language here.
How Not to Change a Date Format for a Different Locale (Region)
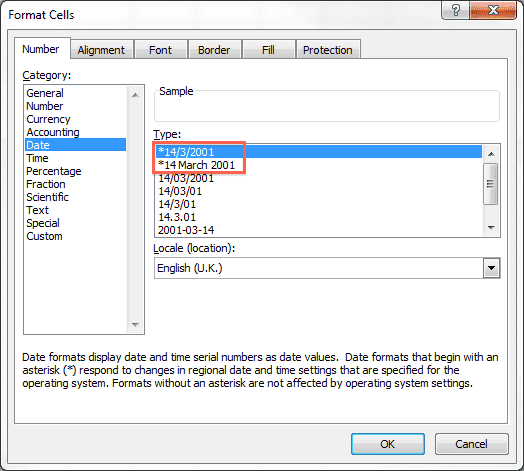
Let's say you are in the US and are designing a spreadsheet that will be used in the UK. You want to see "what they see" and decide to change the cell formatting in a column that contains dates. You select the range, open the Format Cells dialog box (Ctrl+1) then select English (U.K.) from the Locale (Location) drop-down list, and click OK.
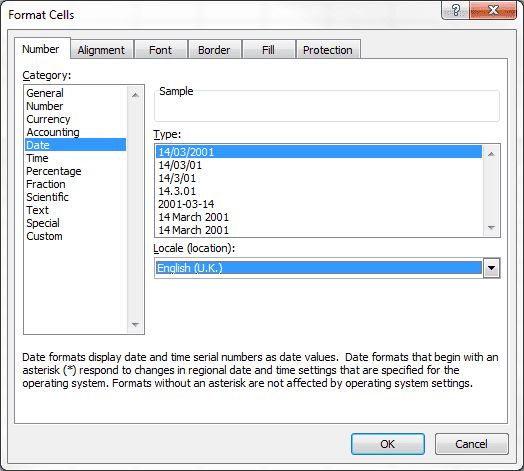
Bad move.
First of all, look at the picture above and notice there are no date formats that have a leading asterisk (*) which means that no date format will survive a change to a different region. You are stuck with this format in every region, whether it's relevant or not.
How to Change Region Settings in Windows
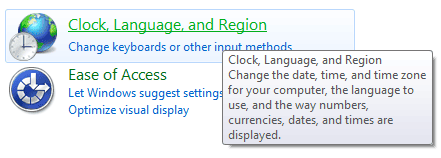
The proper way to "see" a different region's date format is to change your computer's Region setting. Click the Windows Start button and select Control Panel. Find and click the link for Clock, Language, and Region.
Next click the link for Change the date, time, or number format.
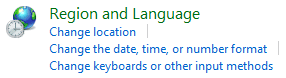
On the Region and Language dialog box click the Formats tab.
In the Format drop-down box select the Region of your choice. In my case that's English (United Kingdom).
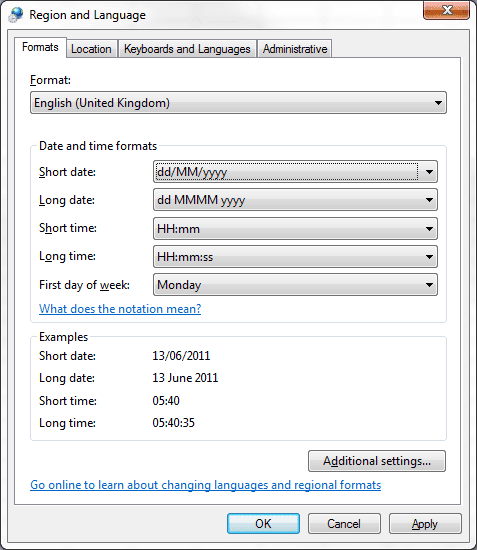
In the screen shot above you can see the Short Date format is dd/MM/yyyy. Click OK to set your computer's region.
Now open Excel and all dates previously formatted with the default Short Date format for the US (*3/14/2001) will show up in the Short Date format for the UK.
To check this fact, select a cell with dates, then bring up the Format Cells dialog box (Ctrl+1) to see that the Short Date format in Excel has automatically changed to *14/3/2001.
This is how you change the date formats for different regions.
Customize the Region Date Format in Windows
I don't like having two digits showing for the day and month in the Short Date format. To me 4 July, 2011 should be represented as 4/7/2011 and not as 04/07/2011. However that's what you get when you select the English (United Kingdom) region setting.
I used a custom format for the UK region short date setting to rid my spreadsheet of the unnecessary zeros. To do this you bring up the Region and Language dialog box, as we did previously, and click Additional Settings... then select the Date tab.
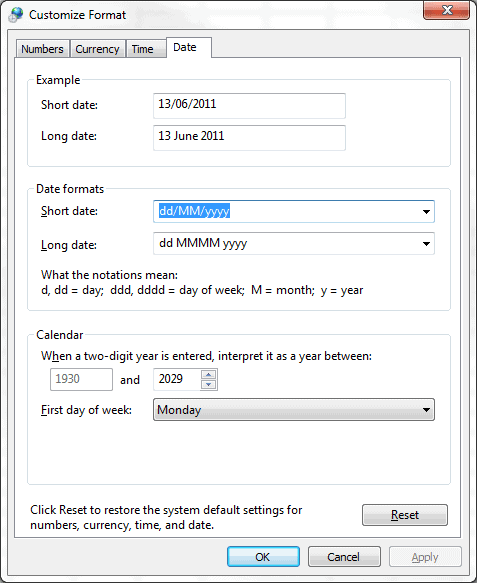
Type d/M/yyy in the Short Date box and click OK.
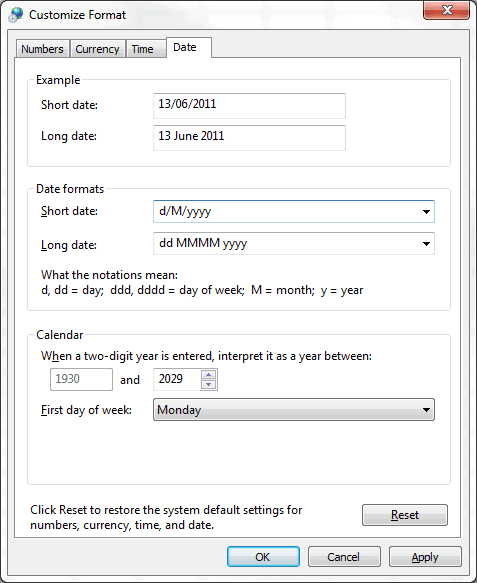
Now all months and days with single digits show up without a leading zero in Excel when using the short date format.
How to Change Region Settings on Mac
Step 1: Change Regional Settings on Your Computer
-
Open System Preferences > Language & Region.
-
Select your desired region from the list.
-
Close and restart Excel to apply the new settings.
Adjusting your system’s regional settings on a Mac ensures that all Apple-native applications, including Excel, use the appropriate date format. This is especially helpful when working on long-term projects involving multiple file types.
Step 2: Change Date Format in Excel
-
Open your Excel spreadsheet.
-
Select the cells containing the dates you want to format.
-
Press Command + 1 to open the Format Cells dialog.
-
Go to the Number tab, select Date, and choose the format that suits your needs.
-
Click OK to confirm the changes.
Best Practices for Managing Dates in Excel
-
Use ISO Date Format (YYYY-MM-DD) when sharing files internationally. This format is universally understood and reduces confusion.
-
Be Consistent: Always ensure your entire dataset follows a single date format.
-
Check Regional Settings: Before collaborating, check and agree on the regional format with your colleagues.
-
Use Data Validation: Prevent incorrect date entries by setting up data validation rules for date fields.
-
Document Your Choices: Add notes or comments to your spreadsheet explaining the date format used, especially when collaborating with others.
Conclusion
Understanding and managing regional date formats in Excel is essential for clear communication and accurate data analysis. Whether you're using Excel on Mac or Windows, adjusting these settings is straightforward once you know where to look.
By mastering date formats and employing best practices, you’ll reduce errors and enhance your productivity when working with international teams. Proper date management in Excel is more than just a convenience—it’s a vital part of effective data handling and collaboration.