Tag Archives: Excel 2003

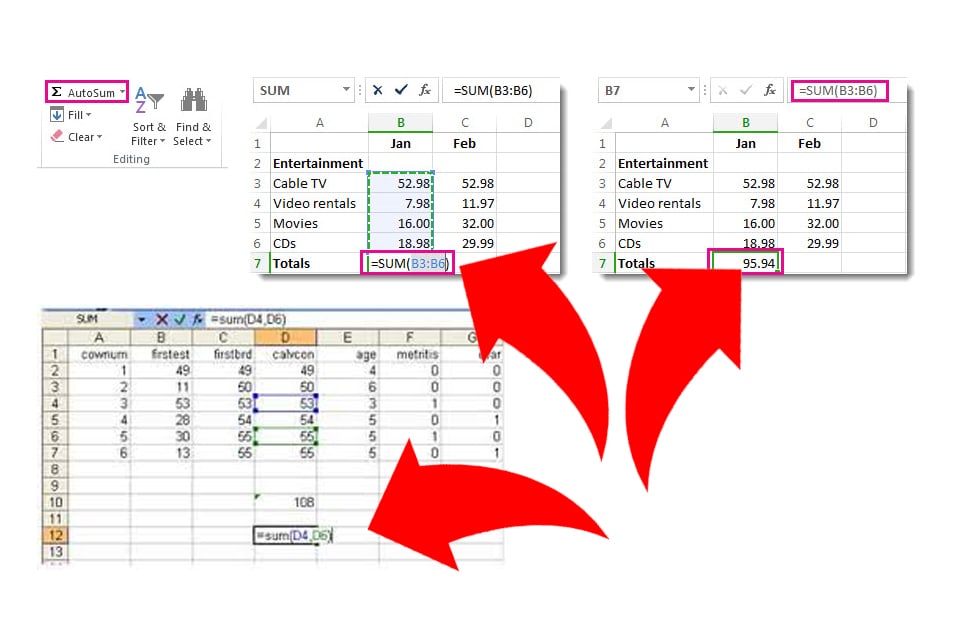
How to add cells in Excel (screen shots of cell data added up via the SUM formula).

How to Add Cells in Excel to Sum Up Totals Automatically

Excel’s great for displaying data and even better at crunching numbers. Here’s how to add cells in Excel to sum up totals automatically… Even when you change the numbers.

A great feature that Excel has to offer is its use of formulas. Since Excel is often used to organize numerical data for a variety of operations, it can be beneficial to have an ‘addition’ function. In this guide, we are going to discuss the various ways we can add cells in Excel.

Why is the Addition Function Useful When You Need to Add Cells in Excel?

As we already know, in Excel Worksheets we can add columns. However, sometimes it is necessary to add cells that are not in columns or are not even next to each other.

For example, let’s say you are performing a survey to present data. You are interviewing random students to find out the most popular subjects taken in school. Your poll is anonymous, allows students to select only one option, and is organized by gender and grade levels Freshman, Sophomore, Junior, and Senior. The survey offers several subjects.

This survey is set up to give you a wide range of information and a variety of totals for you to examine. You could add these totals yourself, or you could use the many ways to add these numbers to Excel.

How to Add Cells in Excel: Method 1 (via Individual Table Cells)

In addition to adding columns in Excel, you can also add horizontally in rows. Let’s say you want to know how many senior males were surveyed. You can do this by adding up all the numbers in the Senior Male row. Let’s say the Senior Males row is row two in columns B2 through H2. One way to add your numbers is to select cell I2 and type the equals (=) sign, followed by the numbers in each cell in that row. For example, it may look something like this:

=5+6+2+7+0+9+1

Then, hit the enter button and you will get your total. While this method works, you will not be able to change the numbers in your cells without also changing your formula.

Because of this problem, it is better to enter the cells than the information within them. Rather than the above example, your formula will look similar to this:

=B2+C2+D2+E2+F2+G2+H2

When you hit Enter after typing this, you will still get your total. However, this time, you will be able to change the information in these cells, and the change will automatically affect the total.

How to Add Cells in Excel: Method 2 (Sum Function)

There is another method to adding rows. In this method, select your total cell. In our case, it has been cell I2. Type the equal (=) sign. Next, click the first cell in your row, or B2. This cell will become highlighted and appear next to the equal (=) sign. Then, type the plus (+) sign and click the next cells in the row. Continue this until you have clicked every cell in the row. Hit Enter to view your total.

Finally, rows can be added in the same SUM Function that we learned with columns. In your total cell, type =SUM. Then, type or click your beginning cell. Type the colon (:) mark and then type or click on the last cell in your row. It will look something like this:

=SUM(B2:H2)

Hit Enter when you have completed this function, and your total will show up. In this function, you can also change the values in each cell, and the changes will be reflected in the sum.

How to Add Cells in Excel: Method 3 (Adding Up Individual Cells In Different Rows and Columns)

The great thing about the addition function in Excel is that you not only get to add rows or columns. You can also add whatever cells you want to. Let’s stay with our survey example. Perhaps you want to examine precisely how many girls prefer math and science. Excel allows you to do this.

Label your first cell to maintain organization in your document. Click the cell next to it to begin your equation. Type the equal (=) sign, followed by all the cells you would like to add together. For example, your equation may look like this:

=C3+C5+C7+C9+D3+D5+D7+D9

Hit the Enter button when you are finished to get your total.

Of course, as we have already learned, it can be a bit tedious and take a while to type all of that. The alternate method would be to click instead of type. In your total cell, type the equal (=) sign. Then, click your first cell. Type the plus (+) sign and click your next cell. Continue this process until you have clicked all the cells you want to add. When you have selected all your cells, hit Enter to get your total.

Using this method allows you to select any cell that contains a numerical value. The values do not have to be in the same row or column or be next to each other. This method also allows you to change information in cells used in your formula. The modified data will automatically update the total to reflect the new numbers.

Conclusion

It was certainly good news to hear that we can add columns of information within our Excel Worksheets. It made life a lot easier and minimized the work we had to do.

Now, we see that we can also add rows as well as individual cells. This guide has expanded what we can do with the addition function. This function could be vital information when it comes to surveys, projects, and organizing business or personal information.

Follow this step by step guide to add cells in Excel using the addition function to its fullest, incorporating rows and cells into your skill set.

How to Update a List or Range without OFFSET

I avoid the use of Volatile Functions, especially OFFSET, which is commonly used to update a list or range. They can slow down the operation of your workbook. For very large workbooks with lots of data, it can be significant and irksome.

Worksheet cells that use Data Validation for a drop-down list can simplify the input process, or be used to limit the available choices. But the list needs be expandable. Here are two primary ways to keep your data validation list automatically updated, without having to resort to using the OFFSET function.

Update Your List Range with VBA

Put your data validation drop-down cell on one worksheet and the reference list range on another worksheet. Example: Sheet1 contains a cell with data validation. Sheet2 contains a data range (the list) that is given a defined name of myList. Add some VBA code in the Sheet2 Deactivate routine to update the named range.


Private Sub Worksheet_Deactivate()
Dim rng As Range
Set rng = Sheet2.Range("myList").CurrentRegion
Set rng = rng.Offset(1, 0).Resize(rng.Rows.Count - 1, rng.Columns.Count)
rng.Name = "myList"
End Sub

This is an event-based programming technique, which I commonly use with Excel 2003.

Data Validation List Lookup 1 Sheet

Use Some Table INDEX Magic

This is a variation of the same thing, but no VBA programming is warranted. Instead, use a Table for your reference list data. Then create a defined name with the INDEX Function, and use that name for the data validation list.

Tables automatically update their ranges when expanded and the INDEX function will too. Example: Create the defined name myListFormula and use =INDEX(Table1,0,1) as the formula. Then when setting the data validation list, use =myListFormula as the list reference.

Data Validation List Lookup 2 Sheet

Example Worksheet

I’ve put together a workbook with the two examples listed above. The first technique, with VBA, uses two worksheets: Lookup 1 and Data 1. The Data 1 worksheet has the VBA code, which updates the named range when deactivated. You can add or subtract to this list and the data validation list on the Lookup 1 sheet will automatically be updated.

Both Lookup sheets have data validation in cell A2, which is a list of names. I’ve added another column for the city that uses a formula to get the right value from the list.

Lookup 1 Sheet

Lookup 1 Sheet

Data 2 with VBA Code

Data 2 Sheet with VBA Code

The second example uses Lookup 2 and Data 2 worksheets. The Table is on the Data 2 worksheet. When you add or subtract data from this Table and the defined name myListFormula will automatically update the data validation list on the Lookup 2 worksheet. Be sure to look at the Define Name dialog box (on the Mac) or the Name Manager (Windows) to see the INDEX formula.

Define Name Dialog Box

Download the file: Data_Validation_List_Update.xlsm

Since there is no OFFSET function, updating at random intervals, in either of these examples, I can rest easy. That’s one less thing to slow down your worksheet.

Analysis ToolPak AddIn

Check the Analysis ToolPak Add-In in Excel 2003 [VBA Code]

Analysis ToolPak AddInI recently began using the NETWORKDAYS function in Excel 2007, yet my file was going to be widely used by people with Excel 2003 (both are Windows versions). The NETWORKDAYS function is a standard function in Excel 2007, but with 2003 you have to install the Analysis ToolPak, otherwise you get an error.

The only way for me to avert an error with users who don’t have the Analysis TookPak installed in Excel 2003 is to use some VBA code that runs when the file is opened. I want to see if they are using a version of Excel older than 2007, check if they have the Analysis ToolPak installed, and then tell them, with a pop-up message, to install the Analysis ToolPak, so all the formulas will work correctly.

Create a Routine to Check for the Analysis ToolPak

Open the Visual Basic Editor (Alt+F11) then choose Insert > Module and enter the following VBA code.


Sub CheckToolPak()
''''''''''''''''''''''''''''''''''''''''''''''''''''''''''''''''''
' Checks to see if the Excel version comes before Excel 2007,
' if so then checks to see if the Analysis ToolPak is installed.
' If not, then notify the user and end the program.
'
' This is required because of the NETWORKDAYS formula
' that is used in the charts.
''''''''''''''''''''''''''''''''''''''''''''''''''''''''''''''''''
If CInt(Application.Version) < 12 Then If AddIns("Analysis ToolPak").Installed <> True Then
MsgBox "Please install the Analysis ToolPak." & vbCr & vbCr & _
"Choose Tools > Add-Ins... " & vbCr & _
"then check the box for Analyiss ToolPak, and click OK."
End
End If
End If
End Sub

The code is somewhat self-explainatory except that Application.Version returns a text value, hence you see the CInt function that converts that text value to an integer so that we can tell if the Excel version is less than 12, which is the version number of Excel 2007.

Create a Workbook Open Event

This will do the trick, but needs a trigger to call the routine. So double-click ThisWorkbook in the Project Explorer of the VBA Editor, then select the drop-down at the top-left of the window – where you see (General) – and select Workbook. The Private Sub Workbook_Open() subroutine will appear with no code.

Type in Call CheckToolPak and then save the file.


Private Sub Workbook_Open()
Call CheckToolPak
End Sub

Now when you open the file with Excel 2003, and don’t happen to have the Analysis TookPak installed, you get the following message.

Analysis ToolPak PopUp

If users have the Analysis ToolPak Add-In installed in Excel 2003 there is no message, nor if the user is using Excel 2007, 2010 or 2011.

Excel 2010 icon

An Excel Crossroads – Mac and Windows

Excel 2010 iconI bought a MacBook Pro and installed Windows 7 with Boot Camp Assistant so I could access the “normal” Excel. This was important to me at the time because I was doing Excel development work in versions 2003, 2007 and 2010 on a Windows PC.

MacBook ProI love my MacBook Pro, which I consider my computer of the future. It’s great for dealing with Photos, Movies, Music, and all of my iOS devices.

I purchased the Mac versions of Excel (2008 and 2011) but they seem like a mixture of the three Excel versions mentioned above, and can be very frustrating at times. There are a few things missing in the latest Excel Mac version, like the Name Manager and the Evaluate Formula dialog box, to name just two.

Despite these shortcomings, I’m seriously thinking about selling my desktop PC and going exclusively with the Mac. That’s the crossroads I’m at right now. Letting go of the PC, but keeping the Windows versions of Excel.

My Hangups

BootCamp allows me to run Windows, and the Excel versions I need, but is very restrictive in the sense that I have to shut down my Mac, then restart with BootCamp to run Windows 7. This is a real pain in the you-know-what.

There are other problems with running Windows on a Mac. For instance, I haven’t been able to get my Apple Magic Mouse to work with Windows 7. (Go figure.) And using Dropbox was the best way to get Excel files between Windows 7 and Mac OS X.

My Saving Grace

All of those issues were solved when I purchased the Parallels Desktop software for Mac. Now I can switch to Windows without having to shut down Mac OS X Lion. That’s just plain awesome!

I’m still getting used to how Parallels works, but this software is easily worth the purchase price. And my Apple Magic Mouse, just works.

Parallels Desktop on my MacBook Pro

Here’s a screen shot of the Parallels Desktop open on my MacBook Pro. You can see that I have Microsoft 2010 (Windows) open, but I want you to notice that I also have the Finder dialog box open.

Parallels Desktop

I dragged the Card Size Lookup.xlsx file from Finder onto the Excel 2010 (Windows) program and it opened. I then made a change to the spreadsheet and saved it. The file was saved back on my Mac from whence it came. This is the miracle of modern technology.

I still have lots of testing to do but it looks like the Parallels Desktop has made my life much, much easier. I know now which way to turn at the crossroads.

Create a List in Excel 2003

The forerunner of the modern Excel Table is know as a List Object. Excel 2003 has this feature, and I’ll simply refer to it here as a List.

To create a List in Excel 2003, select your existing data table and choose Data > List > Create List…, or use the keyboard shortcut Ctrl+L.

Create a List in Excel 2003

Create List in Excel

To Excel will identify the List range and bring up a Create List dialog box. This box gives you the option to re-select the List range and let Excel know if the List has Headers in the first row.

List Selection in Excel 2003

Once you click OK, you will notice several things about this List.

  1. There is a thick blue border around it that becomes a thin blue border if the active cell is outside the List range.
  2. There is a new row at the bottom of the List that’s used to enter new data and has an asterisk in the first column.
  3. There is a default Header row formatted in boldface and has AutoFilter turned on.
  4. There is a List toolbar showing (unless you’ve dismissed it previously).

Create list in excel

The List toolbar gives you several options from the drop-down menu when you create list in Excel. Insert or Delete rows or columns in the List, Sort the List, generate a Form to enter data into the List, Resize the List, or Convert the List to a Range.

You can Publish the List to a SharePoint site, which is something I know nothing about. There are also buttons to Create a Chart, and to Print the List.

You can also Toggle the Total Row which gives you several functions to choose from in each column of the List.

Toggle Total Row in List

These functions all utilize the SUBTOTAL function, which take into account any filtering you may have done in the List.

Give Your List a Defined Name

If you give the List a Defined Name it will automatically expand as the list grows or changes. To do this I select any cell inside the List and use the keyboard shortcut Ctrl+Shift+* to select the List. Choose Insert > Name > Define and give the List a Name then click OK.

Define name dialog box

I can use this TableOne name in the formula =ROWS(TableOne) to see how many rows are in the List, which happens to be 4 at this point.

When I add another row of data to the TableOne List the formula reflects the change, hence Excel is automatically modifying the TableOne Defined Name range. Toggling on the Total Row has no effect on the TableOne range.

List Range Defined Name

This is a nice feature if you want to utilize the imposing INDEX function to refer to a column in the List. I can create a reference to column 2 in this List by choosing Insert > Name > Define and typing a name like ColumnTwoTableOne then typing in the formula =INDEX(TableOne,0,2) in the Refers to box and clicking OK.

What Version of Excel am I Using?

If you’re curious about the version of Excel you’re using and don’t know how to go about it, you’ve come to the right place. It could be as simple as selecting the Help Menu and clicking About Microsoft Office Excel, but then again, maybe not. The five options below will help you sort things out.

Excel for Windows

If you’re using a Windows computer, chances are you’re using one of the three most recent versions of Excel.

Excel 2003

Select the Help menu, then click About Microsoft Office Excel.

About Excel Versions 2003

This also works with earlier versions of Excel (2002 and 2000).

Excel 2007

Select the Office button and click the Excel Options button, then select Resources from the left-hand pane and click the About button.

About Excel Versions 2007

Excel 2010

Click the File tab on the Ribbon, then select Help from the left-hand pane. The right-hand pane has the Version information.

About Excel Versions 2010

Excel for Mac

If you’re using a Mac the two most recent Excel versions, 2008 and 2011, just select the Excel menu, then click About Excel.

Excel 2008

About Excel Versions 2008

Excel 2011

About Excel Versions 2011

Recently Used File List in Excel

How many files will Excel show in the Recently Used File List? Well, it depends on the version of Excel you’re using and vary between 9 and ninety-nine files.

Here is a list of Excel versions, menu navigation to the recent file list, and the max files allowed.

Excel 2010, 2007
File>Options>Advanced tab>under the Display heading:
Show this number of Recent Documents: 50 max

Recent Document List Setting

Excel 2003
Tools>Options>General tab
Recently used file list: 9 max

Recent Document List Setting Excel 2003

Excel for Mac 2008, 2011
Excel>Preferences>General
Show this number of recent documents: 99 max

Recent Document List Setting Excel for Mac

A Related Feature in Excel 2010

At the bottom of the Recent Workbooks list, Excel 2010 has an option you can check to:
Quickly access this number of Recent Workbooks: x

Checking this box adds recent files to the left pane so you can always see the file names. They’re not really the most recent files because they include any files you have pinned to the top of the list, even if they haven’t been opened in a while.

(I covered this feature in a microblog article on Tumblr and in a recent post with video here on this blog.)

Calculate the Xth Weekday of Any Month in Excel

I’ve a simple formula for calculating the Xth Weekday of ANY month. It takes four inputs: Year, Month, Week, and Day. And requires a couple of lookup tables for data validation, one with special formatting.

Xth Weekday of a Month

The History

It all started when my wife mentioned there were a couple of meetings she had to schedule at work, one on the second Tuesday of every month and the other on the third Tuesday of every month. That got me to thinking about how to create a formula in Excel to calculate those dates.

After getting a partial solution, other things took precedence and it slipped from my mind until Chandoo posted a homework article on how to figure out what date Thanksgiving falls on each year, the 4th Thursday of November, in the USA.

His solution and all the variations provided in the comments (I posted one too) was focused and specific to one day (Thursday) of one week (the 4th) in one month (November). Albeit a link in that article showed another formula solution to Canada’s Thanksgiving day that takes place on the 2nd Monday of October.

This served to spur me on and finish what I started. I hope you like it.

The Inputs

Xth Weekday of the Month

Input for the Year in cell A2 is done manually. Just type in a year.

Input for Month in cell B2 is from a data validation drop-down list of values from 1-12. Merely done for convenience.

Input for Week in cell C2 is from a data validation drop-down list of values from 1-4. These are the only values that work correctly in the formula.

Input for Day in cell D2 is from a data validation drop-down list of values from 1-7 that use the “ddd” custom cell format to convert those numbers into an actual date. (You can’t actually type in a text value because what you’re seeing is a formatted date. Below I’ll show an alternate formula where you can use text values like Sun, Mon, … Sat.)

The Formula

The formula for Date Selected in cell E2 is uses the “ddd, m/d/yyyy” custom date format (US) and the formula is:

=DATE(A2,B2,(C2*7+1)-WEEKDAY(DATE(A2,B2,8-DAY(D2))))

Instead of putting all the calculations in the Day argument of the DATE function, you can also write the formula as DATE – WEEKDAY:

=DATE(A2,B2,(C2*7+1))-WEEKDAY(DATE(A2,B2,8-DAY(D2)))

The Explanation – Why This Works

WEEKDAY Inverse RelationshipThis formula has two parts, subtracting the WEEKDAY from the DATE. They both hinge on the fact that WEEKDAY function values are 1-7 for days Sun-Sat, and that an inverse relationship exists for the first week of the month, as shown by the chart. (Eight minus the WEEKDAY value)

Column three is the Day value, or 3rd argument, of the DATE function inside the WEEKDAY function. This relationship works for every day of the week. For a Tuesday, we have WEEKDAY(DATE(Year, Month, 5)). For a Thursday we have WEEKDAY(DATE(Year, Month, 3)).

The DATE Function relies on the Week number 1-4 to generate a date that is one day past that particular week. C2 * 7 +1, is just giving values 8, 15, 22, or 29.

So for a Thursday Thanksgiving in the USA you have

DATE(Year, 11, 29 – WEEKDAY(DATE(Year, 11, 3)))

and for a Tuesday Thanksgiving in Canada you have

DATE(Year, 10, 15 – WEEKDAY(DATE(Year, 10, 6)))

It helps to visualize this formula in the Evaluate Formula dialog box and step through the formula iteration.

Evaluate Formula Xth Weekday of a Month

The Data Validation

One critical aspect of this formula is to get a numerical date value from cell D2 for the DAY function. I use values 1-7 and convert them to Dates by custom formatting the cells with the “ddd” format.

Format Integers to Day Format

Of course this resulted in my date range being 1 Jan, 1900 to 7 Jan, 1900 and is okay for the Windows Date System.

Note: Excel for Mac users check to make sure you’re not using the 1904 Date System, in Excel>Preferences>Calculation look under the Workbook options to see if Use the 1904 date system is unchecked.

If you want to make this work with either date system (Windows or Mac) then choose a month where Sunday is the first day, like 1 Aug, 2010. You’ll need seven dates ending with 7 Aug, 2010.

Alternate Formula Without Custom Formatting

You can, of course, skip the custom formatting for the Day in cell D2 by using straight text values in the data validation list.

Data Validation Text Date List

This requires a different formula and below I’m utilizing the VLOOKUP function.

=DATE(A2,B2,(C2*7+1)-WEEKDAY(DATE(A2,B2,VLOOKUP(D2,{“Sun”,7;”Mon”,6;”Tue”,5;”Wed”,4;”Thu”,3;”Fri”,2;”Sat”,1},2,FALSE))))

The VLOOKUP reads cell D2 then finds the corresponding value in the constant array and returns a number.

Evaluate Xth Weekday of a Month Alternate

To shorten this up considerably, create a Named Constant, like MyWeekday, to replace the array.

Named Constant Array for MyWeekday

The formula can then be reduced to:

=DATE(A2,B2,(C2*7+1)-WEEKDAY(DATE(A2,B2,VLOOKUP(D2,MyWeekday,2,FALSE))))

I’m sure there are other variations. Do you have a better solution?

Download the Files

Here’s a file with the original formula that you can download.

XLSX File Format: Excel 2007, 2010, 2011

XLS File Format: Excel 2003, 2008

Here’s another file with the alternate formula using the VLOOKUP with constant array.

XLSX File Format: Excel 2007, 2010, 2011

XLS File Format: Excel 2003, 2008

My Spreadsheet Challenge Picture

Here’s the picture I entered for the Spreadsheet Challenge.

ESP Spreadsheet Challenge Picture

I’ll point out the obvious and not so obvious stuff in this picture.

  • Me
  • Two monitors showing Excel 2007, Excel 2003, and Excel 2010 spreadsheets, and
  • PDF versions of Excel 2007 Formulas, Excel 2003 Power Programming with VBA, and Excel 2010 Bible
  • A MacBook Pro showing Excel 2011 and Excel 2008 spreadsheets
  • An iPad showing the Documents To Go® Premium App with a spreadsheet open

And hopefully that’s going to get me a prize. 🙂 o_O

Related Posts Plugin for WordPress, Blogger...