Tag Archives: Keyboard Shortcuts

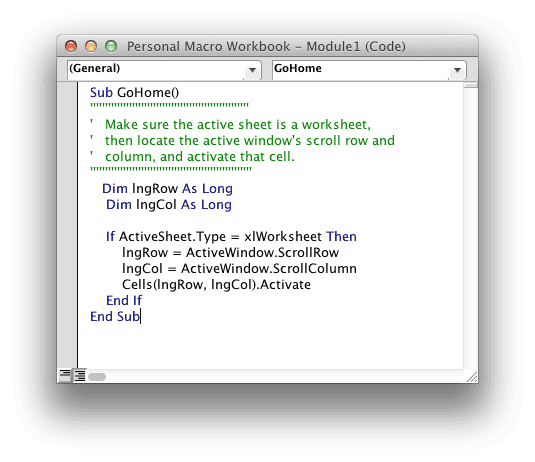
Personal Macro Workbook GoHome Code

Control + Home in Excel for Mac

One of my all-time favorite keyboard shortcuts in Excel is CTRL+Home, but on a Mac there is no Home button. Hence a constant source of frustration these last two years.

I finally decided to do something about that and recently figured out a solution using VBA and the Personal Macro Workbook. But before I go straight to the answer, let me tell you how I got there.

My Journey

I knew that VBA was going to enter into the equation, so I started to record a macro on a Windows PC while using the Control+Home keyboard shortcut. What I found out is that Excel does not record that keyboard shortcut. Nothing, nada, zip.

I then noticed that Control+Home acted differently, depending if the sheet panes were frozen or not. When sheet panes are not frozen, the Control+Home shortcut took me to cell A1. When the sheet panes are frozen, then the upper left corner cell of the window was selected.

To make a long story short, I found out that the active window’s scroll row and column were being selected when the CTRL+Home shortcut is executed in Excel for Windows.

The Control+Home Macro

I also knew that if a Chart sheet were selected the macro would fail, so I crafted the following macro to mimic the CTRL+Home shortcut on a Mac. (Works on a Windows PC too.)


Sub GoHome()
'''''''''''''''''''''''''''''''''''''''''''''''''''''
' Make sure the active sheet is a worksheet,
' then locate the active window's scroll row and
' column, and activate that cell.
'''''''''''''''''''''''''''''''''''''''''''''''''''''
Dim lngRow As Long
Dim lngCol As Long

If ActiveSheet.Type = xlWorksheet Then
lngRow = ActiveWindow.ScrollRow
lngCol = ActiveWindow.ScrollColumn
Cells(lngRow, lngCol).Activate
End If
End Sub

The next thing I did was create a shortcut for the macro, but realized that the macro would only work with the current workbook. Rats!

I wanted the macro work automatically on every Excel file so I chose to store this macro in the Personal Macro Workbook, which solved the problem.

However the shortcut key combination I assigned did not work in Excel for Mac. There was a conflict. It seems that COMMAND+OPTION+H is a reserved keyboard shortcut for the Mac. I found out this shortcut hides all windows except the one that is active.

How I Created the Control+Home Keyboard Shortcut on my Mac

Here are the steps I took, with a few false starts along the way.

  • Open Excel 2011 and choose Tools > Macro > Record New Macro…
  • Type a name for the macro. I used GoHome.
  • Enter a Shortcut key. (I used h, which didn’t work so I changed to g as you’ll see below.)
  • Where you see Store macro in: click the drop-down and select Personal Macro Workbook.
  • Click OK.
  • Record Macro Dialog Box

    I got a warning that the keyboard shortcut Option+Command+h was reserved.

    Reserved Shortcut

    So I chose g instead and clicked OK.

  • Next choose Tools > Macros > Stop Recording. This will effectively end the macro recording without recording anything.
  • Choose Tools > Macro > Macros…
  • Macro Dialog Box

  • Click the Step Into button on the Macro dialog box, which will take you directly inside the macro in the VBA Editor. (Note: While this takes you directly to the macro, it also starts the macro running inside the VBA Editor.)
  • Reset the Macro

  • Click the square Reset button to stop the macro program execution. (Note: If you know how to navigate the VBA editor, you can skip this last step and choose Tools > Macro > Visual Basic Editor and then locate the macro.
  • Select the entire GoHome code from this article. Or click this link and copy from a new window.
  • Copy the text,
  • Switch back to the Excel VBA editor,
  • Select the entire GoHome subroutine, and
  • Paste the code.
  • Personal Macro Workbook GoHome Code

  • Close the VBA editor by choosing Excel > Close and Return to Microsoft Excel.
  • Close VBA Editor

    Now here is the important part so pay attention. You have to save changes to the Personal Macro Workbook. You will be asked to do this when you Quit Excel.

  • Choose Excel > Quit Excel and the following dialog box will appear.
  • Save Personal Macro Workbook Changes

  • Click the Save button when asked, “Do you want to save the changes you made to the Personal Macro Workbook?”
  • Run the GoHome Macro

    Now lets check it out. Open Excel 2011 and select any cell that is not A1, then use the shortcut (mine was Command+Option+g) and watch the active cell change to cell A1.

    If your shortcut doesn’t work you can set it now. Choose Tools > Macro > Macros… and select the GoHome macro, then click Options. Type in a shortcut key and click OK.

    Now choose any cell in the top left quadrant of the current window, like C5. Choose Window > Freeze Panes. Next select any cell except C5 and run the shortcut combination for the macro, and watch the curser jump to cell C5.

    The Personal Macro Workbook will load each time you open Microsoft Excel so it’s always in the background, and you don’t get that annoying “enable macro” pop-up screen.

    Select Excel’s Used Range on a Mac

    I recently read a good blog post over at Contextures about selecting the actual used range on an Excel sheet, both manually and with VBA. However, using Excel on a Mac makes you keenly aware that there’s no Home button.

    The used range on a worksheet starts with cell A1 and ends with the last used cell in the worksheet. This “last cell” is not always apparent, but easily found. Just use the keyboard shortcut CONTROL + G to bring up the Go To dialog box.

    Go To dialog box
    Click Special… which will bring up the Go To Special dialog box.
    Go To Special dialog box
    Select Last cell and click OK.

    The last cell may sometimes surprise, because Excel considers cell formatting as being “used” so you may see blank cells that are way outside your data range. Tip: Sometimes you can delete the seemingly extra rows and columns outside your data range and it will reduce the file size.

    Select the Used Range by Navigating Back Home

    Once you find the last cell, you can then hold the Shift key down and click cell A1 to select the entire range. Of course if you can’t see cell A1 in the current window there is no Home button on the Mac to help you out. (Major bummer)

    The next best thing is to hold the COMMAND + Shift keys down while you tap the left arrow and up arrow keys until you reach cell A1. This can be simple, or time-consuming depending upon size and shape of your worksheet.

    Selecting the Used Range

    To select the entire used range with VBA is a simple matter. Choose Tools > Macro > Visual Basic Editor, then choose View > Immediate Window, and type activesheet.usedrange.select inside the immediate window and hit enter.

    Create a Macro to Select the Used Range

    You can also create a macro to select the entire used range by opening the VBA Editor, inserting a Module, and entering the following code.


    Sub ActiveSheetUsedRange()
    ActiveSheet.UsedRange.Select
    End Sub

    Or you could get fancy with this code.


    Sub SelectUsedRange()
    Dim rng As Range
    Set rng = Range("A1").SpecialCells(xlCellTypeLastCell)
    Range(Cells(1, 1), rng).Select
    End Sub

    Add a Keyboard Shortcut for the Macro

    To make things simpler to run the macro, you can enter a shortcut. Just choose Tools > Macro to bring up a dialog box.

    Macro dialog box

    To add a shortcut, select a macro and click Options… which will bring up the Macro Options dialog box.

    Enter a shortcut key by clicking inside the Shortcut key box and pressing a key on the keyboard. I pressed the “u” key on the keyboard, and consequently the keyboard combination is shown as Option + Cmd + u, as you can see in the screen shot. (Depending on the key, you may also include COMMAND, Control, Shift into your shortcut.)

    Macro Options dialog box

    Enter a description if you wish, and then click OK. Select the Cancel button on the Macro dialog box to make it disappear.

    Now you can run the macro by simply using the keyboard shortcut Option + Cmd + u.

    Note: This macro will not work if a Chart sheet is selected.

    Used Range verses Actual Used Range

    The actual used range might be different than the used range. Meaning that some blank cells that are formatted might be included in the used range. Most likely you will only want to deal with a range that has some actual values. This would be the actual range.

    Please refer to the aforementioned blog post over at Contextures to see a couple of different examples of code that you can use to select the actual used range. These examples are short and use the VBA FIND function to get the job done.

    Import Data From the Web in Excel

    Excel 2010 and 2007 for Windows have the option to import data from the web. Excel for Mac users don’t.

    An integral part of working with Excel is using keyboard shortcuts. They make your life so much easier (in the Windows versions at least, in the Mac version I think they tend to shorten your life span).

    In my last post I dealt with getting a Help Topic URL, here I’m going to use the web page Keyboard shortcuts in Excel 2010 and import to a spreadsheet.

    Get a Help Topic Web Page Address

    As you will see, it helps to have the web address or URL on the clipboard before importing data from the web. In this example I’ll use the following steps to get the URL for Keyboard Shortcuts for Excel 2010:

    • Press the F1 key
    • Type Excel keyboard shortcuts in the search box
    • Click the link for Keyboard Shortcuts for Excel 2010
    • Right click on the topic heading then select Properties
    • Triple click the Address (URL) link then copy (Ctrl+C) to the clipboard
    • Click Cancel and close the Help window

    Now we have the URL on the clipboard.

    Get Data From a Web Page

    Choose Data > Get External Data > From Web to bring up the New Web Query dialog box. This dialog box functions as a Web browser and can be re-sized. Clear the Address bar and paste the URL from the clipboard, then press Enter or click Go.

    New Web Query dialog box

    The web page above will appear in the New Web Query window. Scroll down and you’ll see a right-arrow in a yellow box at the top of each table. Click an arrow to queue any table for import into Excel.

    New Web Query Tables

    We want the entire page so I’ll click the right-arrow in a yellow box at the top-left corner of the web page. This will give us the entire page. Once you click the right arrow it turns to a green check in a box.

    New Web Query Entire Page

    Now click the Options… button then select Full HTML formatting.

    Web Query Options

    Since we’re importing the entire page this option will give the best formatting. Now click the Import button and Excel will ask where you want to put the data. I’m leaving the default location cell A1. Click OK.

    Import Data Dialog Box

    The data on the web page is imported into the worksheet. This is now an active external query.

    Imported Web Page Query

    To Edit the Query choose Data > Get External Data > Refresh All > Connection Properties then select the Definition tab and click Edit Query. You’re now back to the Edit Web Query dialog box where you can make modifications.

    Web Page Connection Properties

    To modify the data range properties, right-click any cell in the imported data range and select Data Range Properties from the pop-up box.

    External Data Range Properties

    The great thing about a web query is that if the web page data is updated all you have to do is Refresh the query to update the worksheet.

    Copy a Help Topic URL in Excel 2010

    Excel 2010 Help is normally connected to Office.com so each Help topic has a specific web address (URL) that can be easily copied. This is only for Windows computers running the latest Excel version 2010.

    You can check the connection status to Office.com by hitting the F1 key to bring up the Help screen, then look in the bottom right corner of the page to see the connection status. There will be one of two options showing.

    • Connected to Office.com
    • Offline

    Help Connection Status Windows

    Get a Help Topic URL

    Make sure you’re connected to Office.com then use the keyboard shortcut F1 to bring up the Help window. In the search box type in something like Excel keyboard shortcuts and press the enter button.

    Help Windows Screen

    You’ll get search results (shown below) and to complete this example click the link for Keyboard shortcuts in Excel 2010.

    Help Search Results

    The topic will appear in the Help window (shown below). Right click on the topic title (highlighted in red) then select Properties from the pop-up box.

    Help Topic Title Keyboard Shortcuts

    In the Properties dialog box, triple click on the Address (URL) to select it, then use the keyboard shortcut Ctrl+C to copy the web address (URL) to the clipboard.

    Help Topic Properties URL

    Another method is to click the Address (URL) and using the keyboard shortcut Crtl+A to select the entire URL, then Ctrl+C to copy it to the clipboard.

    You can use a URL copied to the clipboard in several ways.

    • Email it to someone
    • Use it as a hyperlink in Excel
    • Paste it into your browser to see the topic in a browser window
    • Use it in a web page as a link

    Bonus Tip – Insert a Help Screenshot

    Since Excel Help pops up in a separate window, it can be inserted into the worksheet as a picture. I find this to be useful at times to keep a bit of Help knowledge in the worksheet.

    Here’s a couple of tips I use. First, size the Help window appropriately before inserting into the worksheet, you only get what’s showing in the window so make sure the text you want is visible. Secondly, after inserting the picture, you can use the Picture toolbar to Crop, Resize or modify the picture as you see fit.

    To Insert a Help window screenshot:

    • Bring up a Help topic
    • Size the window
    • Make sure the text you want is showing in the window
    • Choose Insert > Illustrations > Screenshot
    • In the Available Windows drop-down click the Help window

    Help Topic Screenshot Insert

    I cropped the picture above with the Picture tools and could have done some fancy stuff, but that will have to wait for another day.

    Related Posts Plugin for WordPress, Blogger...