In my last post I designed a table and set the cell formatting for the first row of data, which will automatically extend to all new rows of data. The great news is that when I add Conditional Formatting and Data Validation to a Table, they also extended when data is added. But first I want to add a couple of formatting changes to my data entry worksheet.
Table Styles
Changing Table Styles is similar in Excel 2010 ( Windows) and Excel 2011 (Mac) yet the Ribbon is much different. The Mac version has a default Tables tab on the Ribbon. The Windows version only shows the Table Tools tab when a Table is active. The rest of this section deals specifically with Excel 2010, but Mac users can follow along by selecting the Tables tab on the Ribbon.
I decided to change the Table Style because I’m not a fan of the header row with white text.  When you select any cell inside a Table, the Table Tools tab appears on the Ribbon. There’s a Table Styles group that shows a single row of styles in a window on the Ribbon.

On the right there are up and down navigation buttons that allow you to see table styles one-row-at-a-time, which is a big waste of time for me. I click the drop-down button to see an expanded window with lots of Table Styles. As you hover over each Table Style icon, the Table on your worksheet should change its appearance, giving you a preview of what your worksheet data will look like.
If you hover your mouse long enough a tool tip will appear with a Table Style reference. I chose Table Style Medium 23, which gives me black text in the header row.

You can manually change the background color of the header row, which will supersede the Table formatting for any style.
Worksheet Style and Tables
Now that my Table has some nifty formatting, one way to make it “pop” is to remove the ever-present worksheet grid lines. Choose the Page Layout tab on the Ribbon, look for the Sheet Options group, and under Gridlines uncheck View. (Excel for Mac: choose Layout and uncheck Gridlines.)
Another unique fact is that when you scroll down so that the Table header row disappears, the worksheet column letters are replaced by the Table headers.
Of course there’s no word wrap or formatting, but at least you have some idea of what data is contained in each column. I always freeze sheet panes. That way you always see the header row.
Conditional Formatting and Tables
This particular data entry Table records a shift summary for each machine. Meaning there can be mistakes when the summary data is tabulated. One safeguard is to require that Setup, Run and Down Hours equal the Total Hours for the shift. That way errors will get highlighted instead of causing problems later when a report is run.
Select a Table Column
I select the Total Hours data in the Table by moving my mouse to the top of the header cell. When the mouse icon changes to a down arrow, I click once to select the data. (Clicking twice will select the data and the header.)
Use a Custom Formula
Again there are differences between Excel 2010 and 2011 so I’ll give instructions for both.
Excel 2010 (Windows)
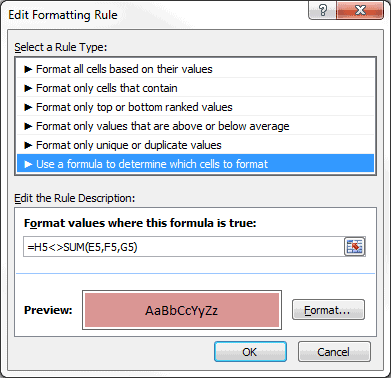
I choose the Home tab on the Ribbon and click Conditional Formatting, select New Rule, then select Rule Type: Use a formula to determine which cells to format. I enter the following formula in the box Format values where this formula is true: =H5<>SUM(E5,F5,G5) then click the Format button and change the background color. Click OK for the changes to take effect.
Excel 2011 (Mac)
Choose Home > Conditional Formatting > New Rule then select Classic in the drop-down box for Style. Click the second drop-down box and choose: Use a formula to determine which cells to format. Enter =H5<>SUM(E5,F5,G5) in the box for the formula. Select the drop-down list for Format with: and select custom format. Then select Fill, choose a background color and click OK.
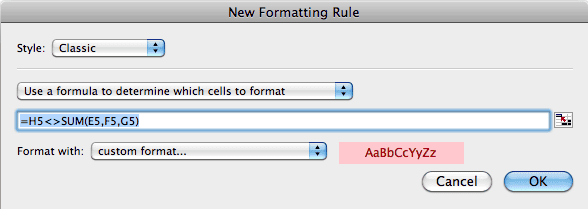
Notice the relative nature of the cell references in the formula. This conditional formatting will now extend as the Table expands with more data.

Data Validation and Tables
Data Validation is a great tool to avoid data entry errors. Dates and numbers can offer different problems so I’ll show you a couple different solutions. Remember that when you add more data to a Table the Data Validation extends with each new entry.
Data Validation for Dates
I’ll add some Data Validation to the Date column because Dates are always tricky. Two common data entry errors are 1) hitting the space bar, which results in having a date, that looks like a date, but is really a text value, and 2) missing the slash between month and day, which results in a date that’s in the year 1900.
I first select Date column data, then choose the Data tab on the Ribbon, click Data Validation (of Validate on a Mac), and select Data Validation. On the Settings tab, I select Date from the drop-down list, and select greater than or equal to from the Data drop-down list, then finally in the Start Date box I type the formula =$A$5 and click OK.
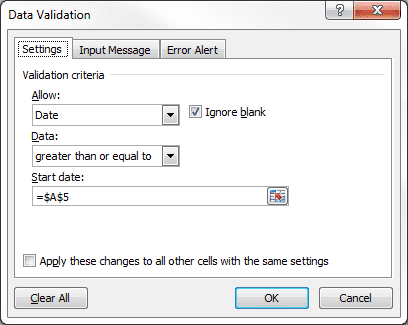
This will ensure a Date is entered and the value is greater than the first entry. If you aren’t going to enter data chronologically and intend to enter data for previous dates, you can manually type in a Start Date or use a Named Range constant value for the earliest date value likely to be entered into the Table.
Add an Error Alert
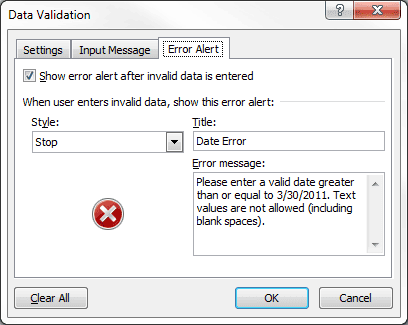
After testing this out to see if it works I decide to enter some Error alert text so the user has some kind of idea why they’re getting the message.
Selecting a Data Validation Range
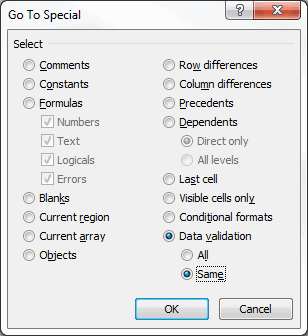
Changing a Data Validation range is problematic because you need to include the entire range with any changes and quite often that comes at a later date when you don’t remember the exact range of rows and/or columns. However, you can select the Data Validation range by selecting a cell that you know has the data validation, pressing the F5 button, click Special, select Data Validation, then choose Same and click OK.
Data Validation for Numbers
In this Table a zero value is not required so users don’t have to waste time typing in a meaningless number. However, an inadvertent tap on the spacebar will leave and invisible text character that can cause #VALUE! errors when used in a formula. A simple Data Validation formula will solve the problem.
I position my mouse at the top of the Number Setups header cell, and when the mouse icon turns to a down arrow I press and hold the left mouse button while selecting all the columns to the right (Table columns D to L). I choose Data > Data Validation (Validate on a Mac) > Data Validation and select Custom in the Allow list, then type =ISNUMBER(D5) for the Formula. Finally, I select the Error Alert tab and enter a Title and Error Message then click OK.
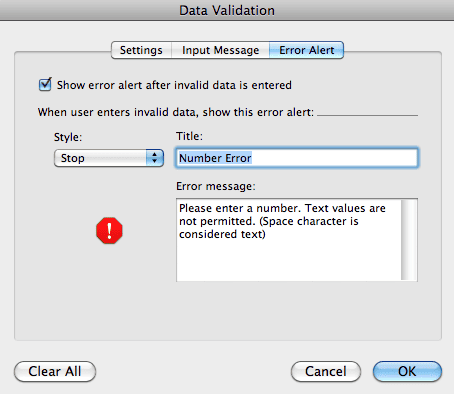
Now if I happen to hit the space bar the following message appears to stop the data entry process.

Reader Tips
I’d like to share some reader comments pertaining to this subject.
One reader comment gave me the keyboard shortcut Ctrl+Shift+L to toggle Filters on and off, which is helpful with Tables.
When fighting fat-fingers on the space bar Conditional Formatting works OK, but one reader gave me a much better solution with Data Validation and a custom formula, which I shared in this post.


I created a spreadsheet in Excel for Mac 2011 with Data Validation fields and saved it as an .xslx
I then opened the same spreadsheet in Excel 2010 as well as Excel 2007 for Windows and all fields that had Data Validation were blank, i.e., the Data Validation was not transferred over.
Is there a fix?
I haven’t heard of that problem so I did just what you said. I created a file in Excel 2011 and used Data Validation, then saved the file. I opened it in Excel 2010 and 2007 and the Data Validation worked perfectly. You must have done something strange or Excel did something weird. I’ll send you my file so you can see if you have the same problem between Excel 2011 and the Windows versions 2010 & 2007.
Just to make sure we’re on the same page – the issue I have had is when creating data validation cells in Excel 2011 for Mac (!) and then open the same file in the latest Windows version or in Excel 2007 for Windows.
Yes, I used my MacBook Pro with Excel 2011 to create a file with Data Validation. I then opened that file on my Dell PC with Windows 7 using Excel 2010 and then with Excel 2007. Both of the Windows versions (2010 & 2007) of Excel had no problem with the Mac version’s Data Validation created in Excel 2011.
I’m having the same problem. Did you get it to duplicate and/or solve it?
@Jennifer, I’m not sure which problem you’re referring to.
I have the same issue – anyone resolve this? I spent weeks on a spreadsheet and forms on Excel 2011 on my Mac. Finally finished. Shipped it out and all the input forms that used drop down lists no longer have Validation associated with the cels.
I too have a similar issue.
I add data validation that references a named list indirectly from the value of an adjacent cell as follows…
=INDIRECT(SUBSTITUTE(E6,” “,””))
If I save -> close -> open or copy the workbook the reference is removed and replaced with a reference error….
=INDIRECT(SUBSTITUTE(#REF!,” “,””))
I am at a complete loss as to why this is happening and have not managed to find a suitable fix. 🙁
/DM
Sometimes data validation requires absolute references, like $E$6 or maybe with a sheet reference added, like MySheet!$E$6. Other than that I’m out of ideas.
After spending most of the afternoon reinstalling office for mac, which has caused a plethora of other issues, it simply seems that the standard Mac Excel file format does not preserve the info on the mac. I ended up trying to save it as .xslm and it worked.
Of course this is absolutely useless for my clients who are still stuck with various archaic versions of office that are incompatible with the .xslm format.
Phah. PITA M$ as usual. 🙁
/DM
Data Validation for Dates
If you want to prevent a Sunday date from going into Column D which is a shipping date column, select Column D, activate the Data Validation feature, select Custom in the Allow panel and enter this formula: =WEEKDAY(D1)1
That’s an invalid formula when I enter it.
try =WEEKDAY(D1,1)
Yes, the formula WEEKDAY(D1,1) is valid and represents a Sunday date. My bad.
The formula shouls have included the not equal to symbol – a “less than” arrow followed by a “greater than” arrow between the right paren and the number 1.
Perhaps the message didn’t display it properly: =WEEKDAY(D1)1
My 2nd attempt to display the formula properly did NOT work. Apparently neither the “less than” nor the “greater than” arrow will display in these messages.
in Excel 2010 gridlines.. i suppose to enter like 20-5, it shows 20-may….how can we over come this kind of probs?
Enter a tick mark as the first character. This tells Excel the cell contents are text, and it’s not visible in the cell,, but is visible in the formula bar.
So entering ’20-5 shows up as 20-5 and not a date. This works for a small amount of entries, but if you have a lot of entries there is another option.
You can change the cell formatting for the entire data range to Text and then you don’t need the tick mark. Just enter 20-5 and that’s what you see.
To format as Text, select your data range and bring up the Format Cells dialog box. (Use the keyboard shortcut Control+1 on Windows or Command+1 on a Mac) Click on the Number tab, select Text in the Categories pane, and click OK.