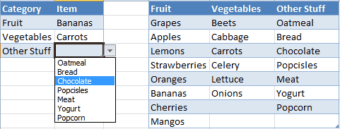
 The other day I was reading a post over at the Contextures blog about Dynamic Dependent Excel Drop Downs and realized that using an Excel Table would provide an alternative method that is both simple and flexible. Tables are available in Excel versions 2007, 2010, and 2011.
In this post I’ll create a Table to hold the Category’s and Items, create three defined names using dynamic formulas, then use Data Validation to create two drop-down lists, the second being dependent upon the first.
Create at Reference Table
Here’s a Table with Category names in the header row and Items in the columns. I just typed in the information then converted to a Table.

Create a Dynamic Defined Name for Category List
Create a defined name for the Table1 Header row range by using the formula =Table1[#Headers]. Please note that Table1 is the name of the Table created in the step above.
This defined name is dynamic, meaning it will expand when more columns are added and shrink if any columns are deleted. It will return the header row of the Table, which we’ll use in the next step. I used myCategory for this defined name.

To create a defined name in Windows choose Formulas > Name Manager then click New…. On a Mac choose Insert > Name > Define…. This will bring up the New Name dialog box that looks like the Edit Name screen-shot shown above.
Create a Category Drop Down List with Data Validation
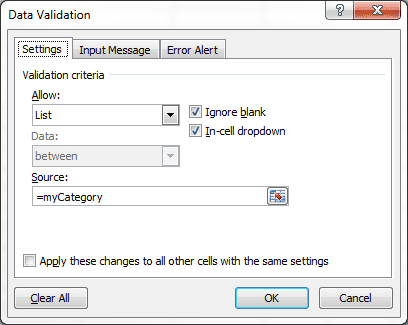
Type Category in cell A1 for the column heading. Next select cell A2, then choose Data > Data Validation > Data Validation… and in the Data Validation dialog box (shown below) select List from the Allow box, then type in =MyCategory in the Source box, and click OK.
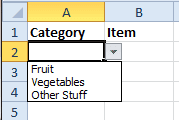
Now cell A2 has a drop down button that shows the Header row of the Table. (Don’t worry about extending this Data Validation down to more rows, we’ll take care of that later.)
Column B will hold a drop-down list for the Item, which is dependent upon the Category. This takes two defined names to work properly.
Create the First Defined Name for Items
[Update: Select cell B2 before you follow this next step.]
Create a defined name with the following formula:
=INDEX(Table1,0,MATCH(Sheet1!A2,Table1[#Headers],0))
that I’ll name myItemList.
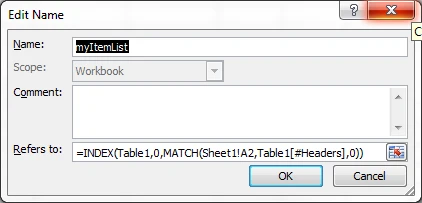
This formula will return a reference to the Table column that matches the Category selection in cell A2 on Sheet1.
If I use Data Validation to create a drop-down list with the myItemList defined name I’ll get eight items returned because Table1 has eight data rows. As you can see in the picture below, the Vegetables item list has two blank lines, and the Other Stuff item list has one blank line. Not an elegant solution.

However, if you have a table that always has equal items (rows) in each column then this defined name formula will will work well for a Data Validation list.
Create a Second Defined Name for Items
We can create a second defined name that will give us a dynamic list with the exact count. The following OFFSET formula will do the trick.
=OFFSET(myItemList,0,0,COUNTA(myItemList),1)
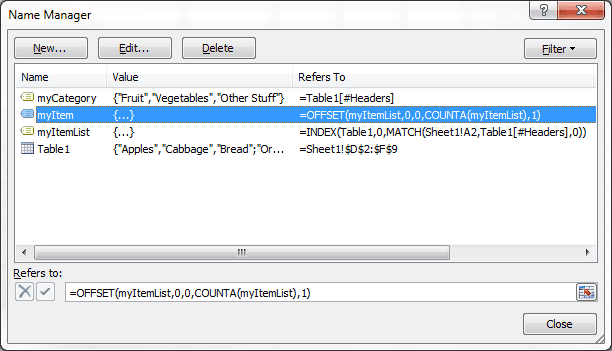
This formula uses the first defined name (myItemList) but alters the height by counting the items. I named this defined name myItem, as you can see below in the Name Manager screen shot.
Create an Item Drop Down List with Data Validation
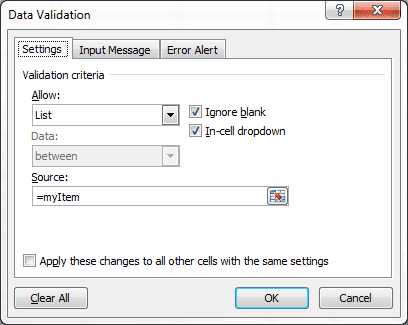
Type Item in cell B1. Select cell B2 and open the Data Validation dialog box. Choose List and enter the following formula =myItem, then click OK.
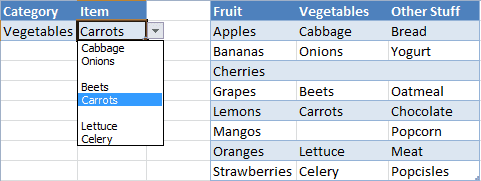
The result is a dynamic drop-down list in the Item column that’s dependent on the Category selection in column A, and returns the exact list.

Convert to a Table
Now it’s time to covert this to a Table, and by doing so the Data Validation will be preserved and automatically expand with the addition of more rows.
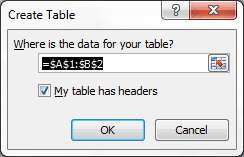
Select cell A2, then in Windows (Excel 2007, 2010) choose Insert > Table, verify the information in the Create Table dialog box, and click OK.
On a Mac (Excel 2011), select cell A2 then choose Tables > New > Insert Table with Headers.
At this point I normally turn off the Data Filter because it’s rather annoying.
As your Table expands, with more rows or columns, this dynamic drop-down list will work just fine. To create a new row in the Table with Data Validation press the Tab key while the active cell is the last column of the last row.
Potential Problem with OFFSET
As you might have guessed the OFFSET formula depends on having items at the top of the list. Should your data have blank rows in the middle of the column, the drop-down won’t have all the items listed yet show blank cells in the list.
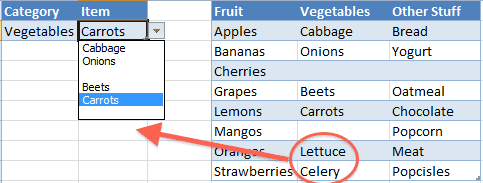
In this case it’s best to use the first defined name (myItemList) in creating a dependent, drop-down list for Item. At least you’ll get all the data, even if it does have some blanks in the list.
Reference Table Location
For illustration purposes I’ve shown the reference Table on the same worksheet as the Category and Item Table. Normally I would place the reference Table on a different worksheet. In this instance none of the formulas would change.

ok i figured it out and feel better – excel can be frustrating…
It doesnt work with excel 2007
=INDEX(Table1,0,MATCH(Sheet1!A2,Table1[#Headers],0))
=OFFSET(myItemList,0,0,COUNTA(myItemList),1)
Go to the bottom of the blog post where it says UPDATE. Then click on the link “download this file” and you will get a working file downloaded to your computer.
Hi,
I have download it but its only working on your file same coding is not working on mine…
Hi Greg,
Great post! It has helped me a lot.
I have used it to create a dynamic drop down on a column of a table that reads the drop down list values from that same column on that same table. It is a great feature since it allows either selecting existing values or entering new ones.
However, when I enter one value on the column more than once it also appears more than once in the drop down list. I have not been able to figure out a way of eliminating duplicates in the drop-down. But I am not a excel semi-pro as you 😉
Do you have any hint to give me?
Thanks a lot and keep the great work here!
Cheers,
Manu
I’m sure there must be a way to do this, but since I’m a semi-pro and not a Pro, I couldn’t tell you what the answer should be. Sorry I couldn’t help. 🙂
Manu – can’t you just use Excel’s autocomplete feature to accomplish the same thing and ditch the data validation altogether?
Hi Gregory.
Thank you for the lovely post and answers.
I have a problem with the dependent lists, and I see it’s also in the sample excel file you’ve distributed, and would really appreciate your assistance on this matter.
The thing is that the secondary list doesn’t update when I change items in the main list. For example, in your excel file, if I change A2 from fruits to vegetables, B2 still displays “Banannas”. Only when I actually click on the drop-down menu in B2 do I see the vegetables. Is there any way to update the displayed value in B2 once I switch items in A2?
Thanks.
Matan.
Assume for a moment that you have a Defined Name Formula that is used in Data Validation for cell B2, and the name is MyFormula and it equals SuperDuperFormula. If you want MyFormula to recognize when there is a blank cell in A2, then you should modify the formula as follows.
First select cell B2, then go to the defined name formula MyFormula and change it to:
=IF(A2=””,””,SuperDuperFormula)
This modification to the formula will look to the first cell that is to the left of the active one, and if there is a blank it will return a blank, otherwise it will execute the SuperDuperFormula.
For the most part, this approach works. However I believe that there is some event-driven behavior with the Data Validation that sometime interferes.
Hope this helps.
Gregory: I think Matan is talking about the scenario where a user has made a choice from the dropdown in B2, and then later goes and changes the dropdown in A2. In that case, the choice in B2 now no longer reflects the choice in A2.
Matan: You would need a VBA event handler to monitor if a ‘master’ dropdown is changed, and then that code could clear the value in the ‘slave’ dropdown.
Here’s an example:
https://sdrv.ms/Zphkl8
The link goes to the Microsoft Excel Web App, which does not support Data Validation or VBA Projecte
Jeff: If your assumption regarding Matan’s question is true, I typically add an IF statement to the defined name formula to look for a blank cell and return a blank, otherwise do the lookup.
Forgot to mention that you have to download the file by clicking File then Save As.
I’m not clear how the IF statement helps once a selection has been made in B2 and then the selection is changed in A2. I think Matan is talking about this scenario:
1. The user selects “Vegetables” in A2
2. The user then selects “Cabbage” in B2
3. The user then selects “Fruit” in A2.
Granted, your IF statement is handly for making sure that you can’t pick a seleciton from B2 UNTIL you’ve made a seleciton from A2. But it doesn’t help with the above scenario, where you in fact DID make a selection from A2, then made a valid selection from B2, but then subseqently changed your selection in A2 making the data in B2 out of context.
Your right about that and would need VBA to update the Data Validation upon a change.
The worksheet I downloaded from your link on the Excel Web App had all VBA and Data Validation removed.
Apologies for that. In short, skydrive sucks. Here’s the file on Google Docs:
https://docs.google.com/file/d/0B1hgC5lSuLjVYnV5am5fWkRvQmM/edit?usp=sharing
Jeff, very nice solution. My hats off to you.
Have uploaded file to Google Docs, because it seems you simply can’t download it properly off skydrive.
https://docs.google.com/file/d/0B1hgC5lSuLjVYnV5am5fWkRvQmM/edit?usp=sharing
Hey, were we able to solve this Jeff? I am looking at the Macro in the file you attached. but given my lack of proficiency with VBA/Macros I am not able to replicate this in my excel.
Any help would be appreciated!
Thanks!
Is it possible to do this if the data contain numbers? i.e.
Building/Room
5555 ->
– 1
– 2
– 3
4456 ->
– 100
– 15
… without having to precede each number with an underscore? The dynamic drop downs are working fine for me, but all of my buildings start with “_”. It works fine like that, but I’m just being picky.
I haven’t tried it with numbers, but I can’t imagine it work work any differently that using text.
Hello!
Thank you very much for this post, I find it very useful, but I have an additional question: Is it possible to keep hyper-links related to a local network folder or another folder situated in My computer, when using this formula?
For example, to be able to open the hyper-link if I select from drop-down list the fruits category (which it’s a hyper-link)
I’m not sure how you would be able to do what you are asking. Sorry I couldn’t help.
your best choice is to use condition formatting in order to change the underscores to a “invisible” color, whatever matches the background, which is relatively easy to do
How can you adapt this to password enable ranges in the drop down list.
For example: I have a range 1 to 30 to indicate % discounts but any sales reps can grant up to 15% (no password required). Manager1 password can allow additional discount to 20% and Manage2 password allows the full range to 30%.
I’m not sure how you would enable password related ranges. Sorry!
The conditional list works well however when I copy the sheet into a new tab, the conditional list stops working. The defined names have twice as many items for example my list that applies to the workbook and my list that applies to the new tab. the dropdown however is no longer conditiona. I’m sure there is an easy fix here but I don’t know enough to do it. Can you please help?
When you copy a sheet with defined names you get duplication. No easy way around that. If you need more than one worksheet in a workbook, the defined names on each sheet must be different.
Excel will usually give you the option to rename the defined names, which is good, but means that you will have to re-do the Data Validation by using the revised name. Sorry I couldn’t be of more help.
This is very helpful. Thanks for posting!
Great post. Note that you can do away with MyItemList (and hence the the volatile OFFSET function it contains) altoghether by using the below formula in place of your MyItem formula:
=INDEX(Table1,1,MATCH(Table2[@Category],Table1[#Headers],0)):INDEX(Table1,COUNTA(INDEX(Table1,,MATCH(Table2[@Category],Table1[#Headers],0))),MATCH(Table2[@Category],Table1[#Headers],0))
(and as an added bonus, there’s no need to select a particular cell when entering this formula)
You can then delete the MyItemList name…it’s no longer needed.
Thanks for the formula. It appears to be sufficiently long enough to give me a headache just by looking at it. 🙂
Here’s a quick explanation.
As you’re aware, you can use the INDEX function to return a cell value from a list or table. For instance, if we want the first row and column of SomeRange, we’d use this:
=INDEX(SomeRange,1,1)
…and if we want the entire row of the first column in SomeRange, we’d use one of these:
=INDEX(SomeRange,0,1)
=INDEX(SomeRange,,1)
And if we wanted something in-between – say the 3rd row or the 7th row, we’d use theses:
=INDEX(SomeRange,3,1)
=INDEX(SomeRange,7,1)
But INDEX does something cool if you use two INDEX functions with a colon in between them…it returns the entire RANGE that lies between the cell that the first INDEX function points at, and the cell that the second INDEX function points at…inclusive of the first and last references.
So for instance this would return an array of all the rows from row 3 to row 7 in the 20th column of SomeRange :
=INDEX(SomeRange,3,20) : INDEX(SomeRange,7,20)
If SomeRange started in A1, then this is the same as saying:
=T3:T20
Given this, we can return a dynamic range that dynamically references a discrete portion of a table using nothing but INDEX.
So for instance, say we have an ‘Input’ table with a ‘Master’ dropdown in a column called ‘Master’ and a ‘Slave’ dropdown in a column called ‘Slave’. And we have a table called ‘Database’ that lists the Master categories across the top in the headers, and the various slave categories beneath each Master heading.
We can build a dynamic range that references the Slave picklist depending on what the Master picklist is set to.
To reference the FIRST cell, we use this:
Formula 1: =INDEX(Database,1,MATCH(Input[@Master],Database[#Headers],0))
To reference the LAST cell, we’ll start by first building a reference to the entire column:
Formula 2: =INDEX(Database,0,MATCH(Input[@Master],Database[#Headers],0))
And now we’ll need to replace that zero with a count of the number of rows that contain text in the particular column we are referencing. To do that, we just wrap Formula 2 in a COUNTA function:
Formula 3: =COUNTA(INDEX(Database,0,MATCH(Input[@Master],Database[#Headers],0)))
…and then substitute Formula 3 into Formula 2 where the Zero is:
Formula 4:
=INDEX(Database, COUNTA(INDEX(Database,0,MATCH(Input[@Master],Database[#Headers],0))),MATCH(Input[@Master],Database[#Headers],0))
So Formula 1 references the first cell of interest, and Formula 4 references the LAST cell of interest. All we need to do now is put a colon between them, and call it a day:
Final Formula: =INDEX(Database,1,MATCH(Input[@Master],Database[#Headers],0)): INDEX(Database, COUNTA(INDEX(Database,0,MATCH(Input[@Master],Database[#Headers],0))),MATCH(Input[@Master],Database[#Headers],0))
Hi Gregory,
Thanks for doing this. I’ve started using this process this week, but I’ve come across one issue: in the final drop-down, the contents of the header row is also showing. I’m using Excel 2011 on Mac (which I hate), so there may be something weird happening there.
Cheers,
Eric
Hi again Greg – solved my Header problem. I had named a range for the Table, and then referenced the range instead of the actual Table; hence the automatic header-ing wasn’t included.
Thanks again!
Hi Gregory, thanks for this very useful post! Is it possible to create a dropdown list that also allows for a list item to have start and end dates? Here’s what I’m trying to get in a column called First Review:
Scheduled
In progress
Completed
Delayed
I’m sorry, but I don’t get what you are trying to express to me. It’s not getting through my thick skull. Not sure what dates you are talking about.
This seems to work great for a two-tier dependent dropdown list, but what about a three tier system? For example, if each item had a list of options to choose from, such as seedless, fresh, rotten, etc. Could that be possible using this method?
I haven’t done a three tier system as of yet. It gets a little more complicated and I haven’t had time to figure it out and write a post.